

I hear from people all the time that they wish they know how to cook, or that they just don’t have the time to prepare home cooked meals. If you follow me on social media, you will know that I love eating, and I cook from home everyday.
There are certain foods that are time intensive, require a high level of technique to execute, or that requires an assortment of appliances. As a result, I don’t make these foods. I have a few criteria when it comes to cooking:
- High Yield – my time invested in making the food results in multiple meals
- High Nutrition – the macro profile of the meal fits my diet plan
- High Taste – the food is delicious and warrants the time, money and effort invested
- Low Effort – the recipe does not involve a lot of hands on cooking
- Low Technique – there are not delicate cooking steps that making a small mistake ruins the meal
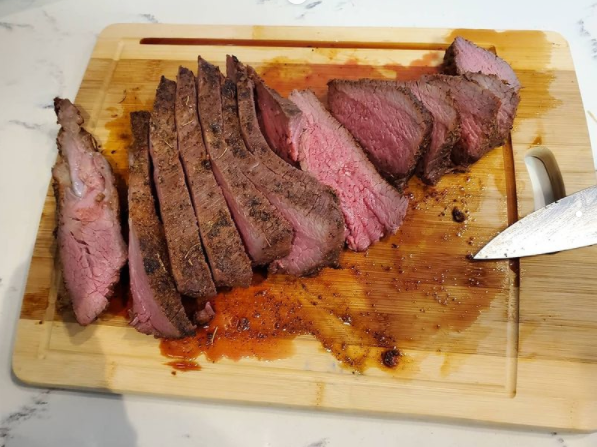
If all that sounds good to you, then I will share with you perhaps the simplest recipe, but the core of my diet: reverse searing meat.
I eat a lot of cuts of meat. NY Strip loins, Rib eyes, back ribs, short ribs, skirt steak, chuck roast, flat iron, tenderloin, ground beef, pork loin, and chicken. Most of the beef I eat is bison, but nearly everything is prepared in the same fashion. Here are the basic steps for the reverse sear method of meat preparation:
Step 1 – Dry Brining
With few exceptions (such as ground beef burger patties), you want to brine your meat at least 30 minutes before cooking. Adding salt to your meat does NOT dry it out, rather it helps the meat retain moisture. It also increases the flavor of the meat, which is an important part of the experience.
When people think of brining, they think of a brine solution. This is a valid method for poultry like chicken and turkey, but not for beef. Instead, I prefer to dry brine. Dry brining also works with poultry.
What’s dry brining? It’s simple, just sprinkle kosher salt generously over your meat on all sides. That’s it. The salt will initially pull out moisture to the surface of the meat, but then slowly it will be pulled into the meat, along with the moisture. Salt is one of the few seasonings that actually gets “in” your meat. Herbs and spices remain on the surface, but salt can penetrate the surface and get deep into the meat. So if you want your meat to taste delicious from edge to center, dry brining is the way to accomplish that.
30 minutes is the bare minimum for me, and usually I dry brine the day before I plan to cook the meat. It takes less than a couple of minutes to pull out the meat from the fridge, quickly dry brine it, and return it to the fridge to rest.
Step 2 – Season and Warm Up
30 minutes before you plan to cook, it’s a good idea to whip out that meat and season it. There are two reasons for this. First, you want the seasoning to adhere to the meat. Usually your meat will have some moisture on it, but if it is really dry, it’s not a bad idea to use some oil, butter, or even mustard (don’t worry, the mustard and vinegar in it evaporate and make no impact on the flavor) to create an adhesive that can bind the seasoning to the meat. Typically I don’t use any binder, as the natural moisture of the meat is enough for me to bind the seasoning, as I generally season lightly. If you season heavily, then you might want to add a binder.
Second, you want the meat to warm up a bit. Especially if you are going to grill, the surface of your meat will be much warmer than the interior. As you start cooking, that differential can be magnified, and result in uneven cooking or gray banding – where the first quarter inch of your steak is well done, and the middle is medium rare.
An ideal steak is the same temperature throughout. Allowing the meat to come to room temperature reduces these differential, and will allow for more even cooking. This is not as an important for slow cooking methods, but for quick fire grilling it becomes much more important.
This step only takes a minute or 2 tops, so we are up to about 4 minutes of labor at this point.
Step 3 – Reverse Sear Cooking
Now it’s time to cook. This is the part that scares the novice. But there is nothing to be scared about – it’s easy with meat!
I either smoke my meat or do a reverse sear, which are essentially the same slow cooking process. To make things simple, I will outline how to reverse sear a cut of meat, since anyone with an oven and a stove top can do this.
First, you will want to have a meat thermometer probe. Nowadays, these are cheap and available in many styles. I like a simple digital probe that connects to an external unit that will sound an alarm when a certain temperature is reached. This saves you the effort of having to check constantly to see if your meat is ready.
With a thermometer, you can cook without actually cooking. I can put in my thermometer into a nice ribeye and stick it in the oven at a low temperature of 225-250 Fahrenheit. You set your temperature set point (when I’m cooking Bison, I set it at 120 Fahrenheit for medium rare). That’s it, you then just walk away and wait until you hear the alarm. Depending on the oven and the meat, you should expect anywhere from 30 to 60 minutes for it to cook.
Keep in mind that your meat will have carry over heat, which means that once you take it out of the heat, the meat will continue to cook up a few more degrees. So it’s always better to be undercooked versus overcooked. You can always return the meat to the oven to cook it more, but you can’t uncook an overcooked steak.
This step only takes another couple of minutes at most of active time. The rest of the work is done in the oven. So we are at 6 minutes of work now.
Step 4 – Searing
Once your alarm sounds, your steak is cooked to the perfect level of doneness. All that is left is to sear the surface of the meat. This accomplishes two things.
First, the surface of the meat is what holds any bacteria or bad things. So searing the surface will kill off the cooties.
The second is a flavor effect that comes with the Maillard reaction. If you ever had a steak with a nice browned crust, that is what it is referring too. It isn’t essential, but it definitely adds to the experience.
Searing is best done with a piping hot pan (I like cast iron), with a small bit of butter to help with browning. Although I have done it plenty of time with just some beef tallow. This part can get smoky if you take long, so if you have a good range hood it will come in handy. Once the pan is very hot, quickly sear the surfaces of your meat for about 10-15 seconds per side. It’s very quick. Any longer and you will start to overcook the steak and cause that grey banding I mentioned earlier.
Getting a good crust requires high heat, a good level of seasoning that has bonded well to the meat, some oil and preferable butter (as the butter browns better). As I said, it isn’t essential, so don’t fret if you can’t get a great crust. The steak will still be delicious. 🙂
If you have issues with smoking pans, just move the pan into your oven to cool off and contain the smoke. But as I do this regularly, I have figured out the balance and don’t have issues with excess smoke.
Again, this step is another couple of minutes. So we are at 8 minutes.
Step 5 – Rest
As great as the steak may look, if you cut into it right away, chances are you going to have a bloody mess. The meat is very warm, and the juices will flow quickly out of it. Some people say it’s a bogus claim, but trust me, it’s better to rest the meat. For a steak like a NY Strip or a Ribeye, 3-6 minutes is enough rest time. For a larger cut of meat like a prime rib or a pork loin, you will want to rest it for at least 30 minutes. General rule of thumb is the bigger the cut of meat, the more rest.
Eat!
That’s it. The actual hands on time for cooking a simple portion of meat (NY Strip, Ribeye, Chicken Breast, Pork Chop, etc), is probably about 10 minutes, spread out over several 2 minute intervals. The rest of the time is just slow cooking or resting. This is an easy method to test out with a single cut like a Ribeye. But it scales just as well with a full 10lb pork loin, which can feed a small family for a week.

I agree fully with your thoughts on cooking. After years of doing it wrong, last year I learned the right way to COOK A 3 LB ROAST. I think you will find it faster and simpler and at least as tasty as your way:
1) remove roast from fridge;
2) turn oven to 500 degrees to pre-heat;
3) mix in a bowl 1 tbsp each of kosher salt, black pepper, olive oil and 2 tsp minced garlic
4) coat the roast with the mixture
5) place the roast in a foil-lined pan fat side up in the 500 degree oven and let cook 15 to 18 minutes.
Then turn off oven but LEAVE THE MEAT IN THE OVEN WITH THE DOOR CLOSED at least 30 minutes or as long as a couple hours. Carve and eat. Place leftovers in a tupperware container and pour the juice over the meat. And eat the next day. And the next. And the next. Great with some mayo, mustard, or horsesradish or any mix of the those, also diced with onions and green peppers and cheese in an omelette. : )